What’s in Season – Courgettes

Ah….courgettes! One of the vegetables most allotment folk grow and look forward to harvesting……until the glut kicks in!

As a veg grower, it is always best to sow at least a few seeds when growing a crop but courgette seeds are usually good germinators. Sow them individually in small pots for best results. However, whilst you may have sown half a dozen seeds which become seedlings and then healthy plants, once you’ve planted them out the realisation hits you that you may just have grown a few too many plants. Once they start cropping, the courgettes keep coming! And whoa betide the allotment tenant who misses a few and finds they have now grown a couple of marrows!

Marrow….incoming!

Joking aside though, courgettes are actually quite a versatile crop. Google ‘courgettes recipes’ and you are inundated with a wide variety of suggestions from cakes, gratins and currently en vogue, spiralizing them!

And talking of versatility, don’t forget courgette flowers are also edible and quite a delicacy; deep fried in batter being a popular recipe. Pick them just as they are opening.

Courgette flowers

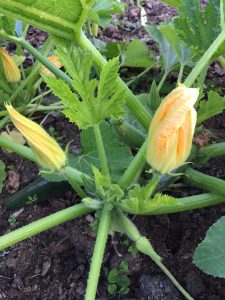
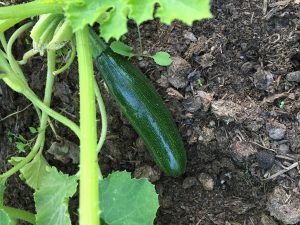
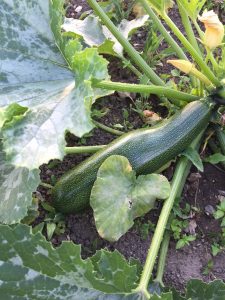
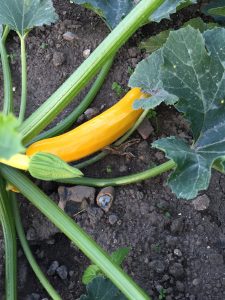
Once established, the plants throw up both male and female flowers with the female flowers being easily recognisable because they have a small fruit behind them. The plants can take up a lot of space and need a lot of watering in hot weather but regular watering will ensure better quality fruit. Pick the fruit when they are young and thin, perhaps around 5″ long and always cut them from the plant with a knife; twisting and pulling them off will damage the plant.

One of the best things about growing courgettes, is the varieties available including yellow ones. There are quite a few heritage varieties out there too.

My only courgette regret this year……not growing any. I actually feel a bit left out that I’m not suffering from a courgette glut!

Asparagus Omelette

If, like me, you have asparagus on the plot, you may be getting fed up with boiled asparagus with melted butter as a starter. I can enjoy it every other day, but every day is too much! I researched asparagus recipes on the web and found several for asparagus omelette. I adjusted one to what was available, and it was delicious!
Phil Charsley

Ingredients (for 2 people)

6 thick asparagus spears or equivalent
about 3oz (80 grams) bacon bits
1/4 red pepper (optional)
4 eggs
salt and pepper to taste
1 tsp olive oil or small knob butter
small quantity milk (optional)

Method

Hold ends of asparagus spears in each hand and bend until they break. Discard hard ends (or use to make soup!) Cut asparagus into half inch lengths.

Slice and dice pepper.

Break eggs into a bowl and whisk to omelette consistency. Add a little milk if you prefer.

Put oil or butter in frying pan, heat and add bacon bits. Fry on medium heat until brown.

Add diced pepper and asparagus and fry for 4 to 5 minutes.

Fry bacon, peppers and asparagus

Pour in beaten eggs. Cook on a medium heat until surface is almost set

Add eggs

Fold over, and cook for a further minute.

Tasty!

Serve and enjoy!

Starting from Scratch – A Year in the Life of a New Plot

In this series of articles we follow Yvonne and Steve during their first year as allotmenteers showing you what can be achieved with a bit of effort and hard graft.

New tenants, Yvonne and Steve took on their plot in mid April 2017. They had no previous allotment experience other than going to their father’s allotment with him when little. They chose a half plot on the Clothall Road site. The plot hadn’t been worked for many years, although a recent tenant had dug out outlines of beds.

The new plot!

The plot had been strimmed in readiness for letting by site rep, Martin Luker, but some weeds still remained.

Keen to get started, they made good progress very quickly and had dug over several beds within a couple of weeks.

First four beds dug

A quick visit to the members’ shop and they were able to plant seed potatoes and onion sets and start some seeds off at home.

A week or so later and more beds were dug and a base laid for the shed, both of which were picked up for free after searching online.

Within a month, amazingly they had dug over the whole plot.

Initial digging over complete!

And were excited to see the first signs of growth as their seed potatoes made an appearance.

First signs of life

Yvonne and Steve have worked really hard over the month to get the initial digging completed. They have also followed sage advice and planted a little too so they can see signs of growth; a reward for all their hard work.

In the next instalment we’ll see what plans Steve has for the shed!

Excess Seedlings

One of the worst faults of a gardener is sowing too many seeds and then not being able to throw any surplus seedlings away. We just can’t bring ourselves to do it, can we?

Well worry not! If members have an excess seedlings they’ve grown, they can now bring them down to the Members’ Shop before it opens on a Sunday where they can be sold to raise funds for the association.
Or maybe some of your seedlings have failed this year and you are looking to plug the gap at a good price?
Don’t forget the shop is open every Sunday from 10am to 12 noon until the end of November.

On a similar note, if it’s plants you are after, the Baldock Horti Soc have a stall at the Baldock Street Fair this coming Saturday where they are selling plants to raise funds; there may be even some veg plants available!

Rhubarb and Vanilla Crumble

This is a recipe I’ve been tweaking ever since I pulled my first rhubarb stalks a few weeks ago. I’ve previously made rhubarb and vanilla jam, which was wonderfully mellow to taste and I was hoping to recreate the flavour in a crumble.

Rhubarb & vanilla crumble

If you have a go, let me know if the sweetness needs amending. Mine was a bit tart still, although the flavours were much more mellow the following day.
Joanna Kent

Ingredients

1lb Rhubarb
4oz Caster sugar
1 Vanilla pod

For the crumble
4oz Plain flour
2oz Butter or margarine
3oz Caster sugar

Method

  1. Preheat oven to 190 deg C (375deg F / gas mark 5)
  2. Wash rhubarb stalks and cut into 1″ pieces. Place rhubarb chunks into an ovenproof dish and cover with the caster sugar.
  3. Cut vanilla pod in half and scrap out the seeds and place in the dish together with the halved vanilla pod.
  4. Stir the contents to ensure all the rhubarb pieces are covered in sugar.
  5. Cover dish with foil. Place in the oven and roast rhubarb for approx. 20 – 30 mins until rhubarb is soft. Remove vanilla pod from dish.
  6. Sieve flour into a bowl and rub in butter or margarine until mixture resembles breadcrumbs. Stir in caster sugar.
  7. Pour crumble mix over the roasted fruit.
  8. Cook in oven for approx. 30 mins until crumble top is golden.
  9. Enjoy with custard, cream or ice cream.